Back to School, CSA, and a Recipe for Rice-a-Roni from scratch

It is almost that time… Back to school for both the kiddos and myself.  In fact, as I write this, I am enjoying my last 2 days before I head back to college on Wednesday.  The kids have another few weeks, lucky ducks.  I am hoping to have a smooth transition this year though, since I will be taking classes while all 4 kids are in school.  Hard to believe my youngest will be starting Kindergarten.  Where has the time gone?

Since I will be starting school again here soon, I can’t promise very many posts but I will make an effort to post every week or two.  Between my 5 classes this semester, helping the kids with their homework, my normal wifely duties, and soccer this next month or so will be swamped.  Hopefully some time will open up once soccer is over in October.

Now for my CSA last week…. I did not get a picture 😦   What I did get was a bunch of basil, 4 more gigantic green peppers, 4 heirloom tomatoes, a bag of fingerling potatoes, a head of red lettuce, 1 Spanish onion, 1 red onion,1 large cucumber,  patty pan squash, and 8 peaches.

peaches


The peaches never even stood a chance.  My kids LOVE fruit, so any time we get some in our CSA its gone in a flash (not that I’m complaining).  The lettuce, red onion, and tomatoes got tossed into a salad we topped off with some of the Olive Garden salad dressing we got from Walmart (Soooo excited they bottled it and sell it now!!  I get to have the Olive Garden taste without worry of being cross contaminated!)  The rest I’m not sure what to do with…

Now for a recipe…  How about some Rice-a-Roni from scratch?!  I found a pin while surfing pinterest for the almost perfect recipe for me to use… After a few tweeks, this is what the end result is!!

Homemade Rice-a-Roni  (gluten free and reg) Serves 2

1 c rice (reg white rice, not the minute stuff)

1/4 lb of angel hair pasta broken into small pieces (I use Hodgson Mill gluten free angel hair pasta for mine)

2 T butter

1/8 t salt (more or less depending on your tastes)

1/8 t white pepper (more or less depending on your tastes- start with a pinch and go from there)

1/4 t paprika

1/4 t Italian seasoning

1 packet of Swanson chicken flavor boost

2 c Chicken broth (Make sure if you are making this gluten free that your broth is gluten free as well!!  Some are not!)

Directions:

1.  Place butter, rice, and pasta pieces in a medium skillet.  Cook on medium heat until rice and pasta start to brown a little.

2.  Add in all remaining ingredients, stirring to make sure they are mixed well.

3.  Put the lid on and cook on medium-low heat for about 20 minutes or until rice is cooked  through and there is no liquid remaining.

That’s it!!  Simple and good, and as a bonus you know what’s in it!!  No extra added chemicals or preservatives!!

Sometimes, if I am in a hurry, I will mix up a big bunch of this and prepackage it for days I am in a hurry.  Just mix together the rice and pasta, place in a Ziploc bag with a smaller bag with the spices, and add the wet ingredients when you go to make it.

Easy peasy and so much better for you!!

Naturally Gluten Free Beef Teriyaki and My CSA Haul for This Week

When I went gluten free, I never thought I would have to give up Chinese/Japanese food.  I mean really, it’s SOY sauce right… As long as I wasn’t eating wontons or battered food I was safe, or so I thought.  Then reality hit… Why was I getting sick after eating at my local Chinese joint?  After FINALLY reading the soy sauce ingredients, I realized I had been poisoning myself every time I ate it.

But how would I live without Chinese food?!  I love Chinese!!

After much research (and a ton of trial and error)  I finally have a recipe to satisfy my cravings for Chinese food.  (Yes I realize Beef Teriyaki is Japanese, but you get my point 😉

beef teriyaki

(Sorry it’s an Instagram photo)

Beef Teriyaki  (serves 4+)

1 1/2 lbs thin sliced beef cut into strips

1/2 c soy sauce ( I use LaChoy because it is the only gluten free kind in my area)

4 T water

2 T lemon juice

2 t sesame oil

2 t brown sugar

2 cloves finely chopped garlic

1 can baby corn drained

1 bag steamed broccoli  (or steam as much or as little as you like)

In a large wok mix together soy sauce, lemon juice, oil, brown sugar, and garlic.  On med-high heat, cook beef in teriyaki mixture.  When beef is almost cooked through, add baby corn and heat through.  In the last minute of cooking add broccoli so it doesn’t get soggy.

Serve over white rice.

I also like to serve these with Feel Good Food’s gluten free dumplings (which are phenomenal btw, if you haven’t already tried them)

That’s it.  Start to finish, it usually doesn’t take any longer than 30 minutes to make, so it’s great for a quick dinner.

Now for my CSA haul.

This week I didn’t get a picture of our haul.  Soccer has me whooped.  Tuesday’s leave me with little to no time to do anything.

This week we received 2 eggplants, 4 very large green peppers, a bunch of kale, a pound of green beans, a pint of blueberries, 2 onions (one of which is the size of a football I swear!!), 4 heirloom tomatoes, and 4 turnips.

Not many plans for this weeks veggies.  Some of them are starting to get repetitive, and I have a hard time getting my family to eat them the first time, let alone the next 3 times!!  My family is not very fond of eggplant or turnips, so using those should be interesting.  Anyone with any ideas on how to use them, please feel free to share!!

That’s all for today’s post.  I will try to post again before Tuesday, but no promises 🙂  Thanks for stopping by, and be sure to say hi!!

Super Late CSA Post and a Quick Recipe for Gluten Free and Regular Chicken Gyros

Okay so this week’s CSA post is really late.  I am just off my game lately.  The new medications I am on make me a bit ditzy and forgetful, so bear with me.

This week’s basket was a pretty good one.  I use a lot of the vegetables we received this week, so it is a  lot less likely to go to waste.

csawk05

This week we received a small bag of baby potatoes, 2 cucumbers, a basket of blueberries, a bunch of kale, 4 Hungarian hot peppers, 4 heirloom tomatoes, 4 HUGE green peppers, 2 eggplants, and 1 head of cabbage.

We usually use our kale for Zuppa Toscana which you can find in a previous post, the cabbage I have been shredding and adding to my lunches (which I will post soon), the peppers are going to end up being some really, REALLY big stuffed peppers for dinner one night, and the rest I am not sure.  The tomatoes are good just eating raw, as are the cucumbers, but I am getting tired of eating them the same way every time, so I don’t know.

Now for the recipe…

Chicken Gyros (Gluten Free and Regular)

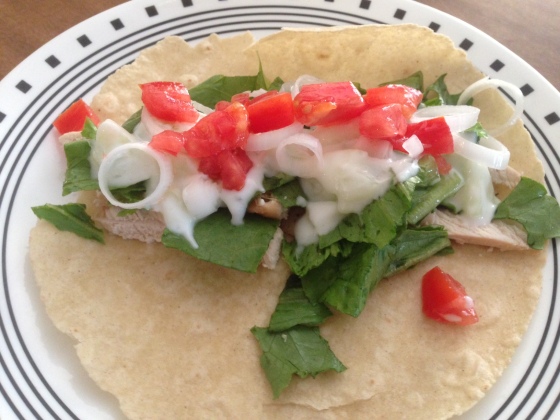
chicken gyros

Chicken Gyros

Flat Bread or Gluten Free Tortillas (I use Rudi’s)

Prepared, leftover, or rotisserie chicken

Chopped lettuce

Chopped tomatoes

Chopped onions

1/2 or so Sour Cream or Plain Yogurt (if you are trying to eat healthy like me)

1/2 cucumber grated

Basically you just want to pull apart the chicken so that it is somewhat bite sized, and set aside.

Take a box grater, and grate the cucumber into a bowl.  Add the sour cream or yogurt and let rest for about 5 minutes so they have time to really mix flavors.

Assemble.  Flat bread or tortilla, chicken, lettuce, tomato, onion, and sour cream/cucumber mixture.

That’s it!!  Super easy, super quick, and super yummy!!

Well that is all for this post.  Hopefully I will be able to get a little more motivated to get some additional posts up this week.  I have a fantastic Beef Teriyaki recipe from scratch that everyone loves, so I am hoping to get that one up soon.  If you have any additional recipes you would like to see on the blog, please let me know.

Late CSA Tuesday

This week hasn’t been the easiest on me.  I went to the doctor’s on Friday and got some bad news, so I have switched my medications accordingly.  And the new meds… yeah they really don’t seem to agree with me.  I am hoping it is just and adjustment period and I will be back to my old self soon.  In addition, I have been put on yet another diet as if gluten free wasn’t hard enough all on it’s own.  So you will be seeing more healthy versions of recipes, not that they are all that bad to begin with.

Seriously, I am the healthiest eater I know.  I don’t go out to eat.  I don’t eat fast food.  I don’t eat processed food.  Yet, I have astronomical LDL-p and triglyceride levels.  So high, in fact, that my doctor has seen less than 5 cases in his career that were as high as mine, and I am the youngest person he’s seen with these levels.  Everyone else has me beat by 10+ years.  (For the record, I am not obese either.)  Can you tell I am frustrated?  Cuz I am!!  Okay…. rant over.

Now to the good stuff.

CSA Tuesday

I realize this is a little late, but the above situation kinda has me down in the dumps, and sometimes nauseated and extremely tired.  This week we had a slow week.  Our weekly email from Grow Youngstown informed us that because of the weather being so wonky lately, the variety was not where is usually is for this time of year.  Either way, we were still happy with our bounty.

csawk04

This week we got a bag of kale, a patty pan squash, 2 cucumbers, 7 Hungarian hot peppers, a bag of purple potatoes, 2 HUGE onions, a bag of yellow wax beans, 7 peaches, and a bunch of parsley.

Honestly I am kinda glad our bounty was on the smaller side this week.  I still have veges left over from the previous week, and for the most part, the ones included in this week’s share are the ones I am most likely to use.

Now the patty pan squash and Hungarian peppers may prove a little difficult.  I have never had patty pan squash before, so I am not sure how it tastes, or how to cook it.  I did look up a few recipes, and saw that most people seem to stuff them, so perhaps I will try that.  The Hungarian peppers really have me stumped.  I found one recipe that I may try that also stuffs them, with Italian sausage and a cheese mixture, and grills them, but I am not so sure my kids will like them.  We aren’t real big with the hot stuff.  If all else fails, I know my dad will get some enjoyment out of them.

Anyone have any experience with patty pan squash or Hungarian peppers, and would like to share a recipe?  I am all ears (or eyes *wink wink*)


Cabbage Rolls (Naturally gluten free!)

Cabbage rolls are a family favorite.  And when I say family favorite, I mean I love them even if no one else in my house does.  Luckily for me though, my extended family is always willing to help out eating them.  In fact I know right now, my mother and sister would kill for one of my cabbage rolls.

Cabbage rolls are really not all that difficult to make, but they are a bit time consuming so make sure you have some time to spare.  Especially if you are making them for the first time.  It does take a bit of practice to peel the boiled cabbage leaves from the head.

This is an old family recipe.  It is not extravagant, but it has been used in our family for at least the past 30 years if not longer, and we love it.  Certainly comfort food for us.

*Also, fair warning!!  Do not eat too many, or you will get a belly ache!  And don’t eat any if you have a dr appointment, or they will wonder if something is wrong with you…lol  I know this from experience!!*

cabbage rolls

Cabbage rolls

1 head of cabbage (Mine was from our local CSA!)

1 1/2 lb hamburger

1/2 c rice

2 eggs

2 t Italian seasoning

1 sm onion chopped

sauerkraut

tomato juice

Boil the head of cabbage in a large pot until leaves are tender and pliable.  Remove the hard “stem” like parts from each leaf.

In a separate bowl, mix together hamburger, eggs, rice, onion, and Italian seasoning.

Take one cabbage leaf in your hand.  Place a decent amount of hamburger mix on the leaf, and roll it up like you would wrap a package.

Place in crockpot, and repeat until all hamburger mix is gone.

Cover rolls with sauerkraut and tomato juice, and cook on high for roughly 5 hours or so.  The longer they cook, the better they come out (provided you don’t burn them.)

That’s it.  Easy Peasy.

I usually serve mine with boiled, smashed potatoes covered in butter, and corn bread if I have the time to make it.

Hope you enjoy this recipe and more, and don’t forget to stop in and say “Hello!”

CSA Tuesday and a Recipe for Zucchini Bread (Gluten Free and reg)

I am super stoked for CSA Tuesday this week. Each Monday night I get an email from Grow Youngstown explaining what I get it my basket that week. Let’s just say this week is going to be awesome!! I got 7 peaches, a pint of blueberries, a bunch of kale, a bunch of rainbow chard, a head of cabbage, 3 onions, 2 heads of garlic, 2 cucumbers, 2 zucchinis, and a 1/2 lb of beans. No picture of this week’s bounty until tomorrow though. After a long day in the heat at soccer practice, it’s all I can do to get this post up.

Now for a recipe. Everyone loves Zucchini Bread. Well at least everyone in my house does. And did I mention that is the only possible way to get my husband to eat zucchini?! Cuz it is. And it sucks since I keep getting tons of it in my CSA as well as coming out of my own little garden. Luckily I have found that you can shred the zucchini ahead of time and freeze it for future purposes. Just thaw and squeeze out the extra juices with a towel.

Anyways… on to the recipe.

zucchini bread

Zucchini Bread (makes 2 loaves)

4 eggs

1 c. sugar

2/3 c vege oil

1/2 c applesauce

1 T vanilla

2 c zucchini (shredded)

1 T cinnamon

1 t salt

2 t baking soda

2 t baking powder

*For non-gluten free sub the following ingredients with 3 c all purpose flour*

1 c rice flour

1 c sorghum flour

1 c tapioca starch

2 t xanthan gum

Preheat oven to 375* F. In a large mixing bowl, mix together eggs, sugar, oil, applesauce, and vanilla. In a separate bowl mix together remaining ingredients except zucchini. Putting your mixer on low speed, pour flour mixture into wet ingredients one cup at a time, until well mixed. Once wet and dry ingredients have been combined, fold in zucchini. Pour into 2 bread pans (make sure to spray them so they don’t stick). Place in oven and bake for roughly 50 min- 1 hour or until a knife inserted into the middle comes out clean. Let cool, and enjoy!!

Personally, I like mine slightly warm with butter spread on it. Yum Yum!!

Hope you enjoy this recipe, and feel free to share using one of the buttons below. I love sharing and feedback!!

Blueberry muffins~ Gluten free and regular from scratch!

In my last CSA basket we received a basket of blueberries.  While my kids are perfectly happy eating them right out of the basket just the way they are, I managed to save most of them so I could make some blueberry muffins.  Unfortunately, the recipe I usually use uses and ingredient that I didn’t have on hand.  So that sent me on a search for a new, hopefully just as good, recipe using what I already had in the house.

This is the recipe I found.  I added a few modifications to make it just right, and they turned out phenomenal.  Much better than usual.  I hope you will enjoy them as much as I do!

bbmf1

Blueberry Muffins  (makes 1 dozen)

1/3 c almond meal

1 c white rice flour + 2T

1/2 c tapioca starch

1/2 t xanthan gum

* If you are not making these gluten free, substitute the above ingredients with 1 1/2 c all purpose flour*

2 t baking powder

1/4 t nutmeg

2/3 c white sugar

1/2 c butter

1 T vanilla

2 large eggs

1/2 c milk

zest of 1 lemon

1 1/2 c blueberries  (I probably didn’t have that much… use as much or as little as you want)

Preheat oven to 350*F

In a large mixing bowl, place eggs and start the mixer.  Add the white sugar, butter, vanilla, milk, lemon zest, and nutmeg, and mix until well blended.  Turn mixer off.  Add flour, almond meal, tapioca starch, xanthan gum, and baking powder.  Mix until thoroughly blended.  Fold in blueberries.

Place liners into muffin tin.  Fill each liner as close to the top as you can get it, while making sure you have enough to fill all liners.  Place in oven and bake for roughly 25 min or until the tops are firm to the touch.  (My oven takes a little longer, so it was more like 30 mins)

*Note~  If you are making these gluten free, the tops may not be browned.  This is okay.  As long as they are done in the middle they do not need to be brown.  🙂

Cool and enjoy!!

bbmf2

I added some streusel topping to mine.  It is optional, but the ingredients are below.  Add it to the top of the muffins before baking.

1/3 c white rice flour

3 t tapioca starch

1/4 c brown sugar

1/2 t cinnamon

pinch of salt

2 T soft butter

Mix them all together using a fork.  Add to muffins before baking.

Personally I like them with or without the topping.

*For gluten free baking I usually get Bob’s Red Mill flours.  They are the most readily available in my area.*

I hope you enjoy this recipe, and will keep coming back for more.  If you have a friend that might benefit from this blog, please pass it along.  Thanks for stopping in

Lasagna~ a recipe for all that spaghetti sauce

Now that you know how to make some kick butt spaghetti sauce that could feed an army, lets get to some recipes that make use of it all.  First up …. Lasagna!!

After experimenting for a while to try one that everybody loved, I finally think I found it.  My husband took a pan of it to work to celebrate their last day before going on a 2 week “vacation”, and one guy had 6 pieces!!  I could barely finish off 1 piece!!  I think that means this recipe is a winner. So on to the good stuff….

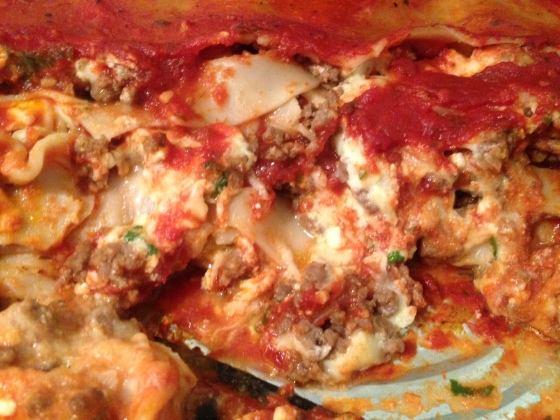
lasagna

Lasagna (makes 2 pans)

24 lasagna noodles ( I made one pan with gluten free noodles and one with reg. noodles)

1 lb hamburger

1 lb Italian sausage (bulk)

homemade spaghetti sauce (I used 2/3 of the bulk kind I made in my other post)

3 eggs

chopped parsley (roughly half a bunch you get from the store)

1 1/2 c parmesan cheese

7 c mozzarella cheese

1 large container ricotta cheese

1 small container cottage cheese

Preheat oven to 425*F.

In a large pot, cook lasagna noodles according to the package.  Drain and set aside.

While the noodles are cooking, in a large pan, brown the hamburger and Italian sausage.  Set aside.

In a large bowl, scramble the eggs and add in the chopped parsley.  Mix in the ricotta, cottage, parmesan, and mozzarella cheeses until well blended.

Now you are ready to assemble.  Starting with a large baking dish (I use a 9×13″) spread a small amount of sauce in the bottom of the dish.  Lay down 3 pieces of lasagna. Top with hamburger/sausage mixture, sauce, and cheese mixture.  Repeat until all of the noodles are used.  Top the top noodles with sauce and cover pan with aluminum foil.

*Remember this makes TWO pans worth of lasagna*  So don’t try to squeeze all the ingredients into one pan 😉

Bake the lasagna at 425*F for roughly an hour to an hour and a half, or cooked all the way through ( the cheese deep in the middle is melted).

It seems like a pretty long process but it’s not really.   And you get two pans worth instead of just one.  If you don’t need two pans of lasagna right away, you could always freeze the other one for a quick dinner when you don’t want to cook.  Just pop it in the oven and let it cook away.  No prep and no fuss, and waaayyyy tastier than the frozen ones you buy at the store!!

I hope you enjoy it, and feel free to share this post or any others with your friends, fellow bloggers, facebook family, and more!  I’d really like to get some suggestions for meals and more.  Don’t forget to “like” my page on facebook too!!

CSA Tuesday and a Recipe for Spaghetti Sauce

It’s CSA Tuesday again!!  I freakin love Tuesdays.  I am always super excited to see what I will get in my share for the week, and come up with something different to make with all the fresh produce!  My husband thinks it’s a tad bit odd that I get excited over vegetables, but you know, I just can’t help it.  Sadly, it is just as bad when I discover a new vegetable growing in my garden.  Today I found a summer squash that was ready to be picked, and I brought it in the house and paraded it around like a new show pony.  I couldn’t help it.  This is the first year my meager gardening skills have actually produced more than just one radish and two green beans.  (And yes that was my previous record for vegetables)  I am starting to think the older you get, the more your green thumb comes out.  Anyhow, I am pretty stoked.

This week my kids helped me pick up my goodies from the CSA.  We picked up 1 head of cabbage, 1 spanish onion, 1 bunch of rainbow swiss chard, 1 bag of shell peas, 1 head of lettuce, 2 large cucumbers, 2 huge zucchini, 2 huge summer squash, 2 heads of fresh garlic, 1 of the biggest bunches of basil I have ever seen, and a small basket of blueberries. (It was a choice between blueberries, raspberries, and black raspberries)

csawk03

Did you see that head of cabbage?!  Its the size of Little Man’s head!!  (BTW… that is Little Man in the picture.  He insisted 😉

The blueberries are soooo juicy and sweet.  Little Man couldn’t keep his hands out of them, and I had to eventually hide them so I could make muffins with them later.  This picture is after he had already picked off a handful or so.  He is super sneaky.  😛

So what do I have planned with my haul?  Really I have no clue!  Onions are always easy to use, and the garlic is going to dry since I recently bought some.  I am thinking I will save some basil to have on hand fresh and dry the rest.  I am going to try a few ways I have seen on pinterest, and see how it goes.  I am not too concerned though as I still have my own growing in my garden.  The rest I have no clue…. so much produce and not enough ideas I guess.  I’m just now getting to some of the produce from last week’s CSA!

Now for the recipe…

I used to buy bottled stuff.  My mother used to make her own spaghetti sauce when I was a kid (well she still does) but I never liked it.  Now that we are trying to live more frugal, and eating more whole foods so to speak, my Ragu is no longer going to cut it.  I can make 4 times as much for half the price.  So I started experimenting, and so far everyone has really enjoyed my new (semi) home made spaghetti sauce.  So here it goes…

tomasauce

Spaghetti Sauce  (makes a whole lot)

1- 6lb 9oz can of tomato sauce

1 onion chopped

3t chopped garlic

2t dried oregano

2t dried basil

3-4 bay leaves

roughly 8-10 sprigs of thyme

2 pinches of dried rosemary

dash of sage

fresh chopped parsley

1/4 c sugar

1T extra virgin olive oil

In a large saucepot, add the olive oil, onion, and garlic, and cook until onions are soft.

Add tomato sauce and all seasonings including the sugar, and simmer on low for about 1 1/2 hrs stirring occasionally.

Before serving, remove the bay leaves and sprigs of thyme.

That’s it!!  Super easy!!  The hardest part is measuring all the seasonings and getting them just the way you want them.  The best part of making your own sauce is you control the flavor.  Feel free to experiment and make changes as you see fit until it is perfect for you!!

Now that I have made my sauce from scratch I don’t think I will ever buy the bottled stuff again.  I have had so many compliments about this sauce it would be crazy to go back to bland bottled stuff.  And now that you have the recipe for sauce, I have plenty more recipes to use it with.  Don’t let all that extra sauce go to waste!!

Why my girls are going to hate me.

Our kids all have chores.  My oldest takes out the trash and helps with the laundry, my two girls do the dishes and wipe the table, and my youngest helps me set the table before dinner.  Now mind you, that is in addition to keeping their own rooms tidy, which can be quite the task.

Usually the girls’ chore only happens after dinner, or first thing in the morning…. between yesterday and today, they are going to hate me.  😛

Since my husband is on “leave” so to speak for two weeks while his car making plant is on their mandatory two week shut down, we have been trying to save money any possible way we can.  Which means no more paper plates.  No more paper plates = more plates in the sink.

Yesterday was quite possibly one of the worse days this summer.  Besides getting some not so great news, I had something bad happen…. I was going out to get something from our deep freezer for dinner.  I opened the lid, and TADA!!  It was not running, and half of my food was thawed.  :O  In a massive panic, I cleaned out the freezer and brought everything inside to take inventory of the things I could salvage.

I cooked 5 meals worth of food last night.  Which in turn = more dishes.  And since I was so focused on saving what I could from my deep freezer, I didn’t even get the chance to cook up hardly any of the produce that’s just chillin’ in my fridge from my CSA.  So guess what will be happening tonight….. Yep you guessed it.  More mass amounts of cooking and prepping… which means more dishes.

I swear my girls have washed every dish in the house like 3 times since last night.  After tonight, I’d say they earned a treat of some kind!